Connecting Microservices — UCS Tools Documentation
Title: Connecting Microservices — UCS Tools Documentation
URL Source: https://docs.nvidia.com/ucf/2.10.0/text/tutorials/02_Connecting_Microservices.html
Published Time: Thu, 30 Oct 2025 07:23:04 GMT
Markdown Content: Connecting Microservices#
Housekeeping#
See the Getting Started documentation for installing and setting up:
-
microk8s
-
UCS Tools
-
accessing NGC
-
setting up repositories
-
Introduction#
In this tutorial, you will create a UCS Application composed of two microservices that can talk to each other. Specifically, you will create a simple HTTP server using the python -m http.server module and a client that can communicate with the HTTP server using curl.
This tutorial helps you learn the basics of:
-
defining microservices using Ingress/Egress Endpoints, and
-
defining applications using Ingress/Egress Endpoints.
Defining Microservices using Ingress/Egress Endpoints#
First, create a microservice that will act as an HTTP server:
$ cd $HOME/ucf_tutorial/services $ ucf_ms_builder_cli service create -n http-server -i container-image
Replace the contents of the http-server/manifest.yaml file with the following:
type: msapplication specVersion: 2.5.0 name: ucf.svc.http-server chartName: http-server description: http server version: 0.0.1 tags: [] keywords: [] publish: false ingress-endpoints:
- name: http description: REST API endpoint protocol: TCP scheme: http mandatory: False data-flow: in-out
spec:
-
name: http-server-deployment type: ucf.k8s.app.deployment parameters: apptype: stateless
-
name: http-server-container type: ucf.k8s.container parameters: image: repository: nvcr.io/nvidia/pytorch tag: 22.04-py3 command: [sh, -c] args: [ "python -m http.server 8080 "] ports:
-
containerPort: 8080 name: http
-
name: svc type: ucf.k8s.service parameters: ports:
-
port: 8080 protocol: TCP name: http
The above specification should look familiar to the microservice you defined in the previous “Hello World” tutorial (check that out if you haven’t already!).
You will also notice three additions:
-
A keyword
ingress-endpointswith several parameters detailing: name, description, protocol, scheme, mandatory, and data-flow -
A keyword
portswith parameters to the UCS Container Component -
Another UCS Component of type
ucf.k8s.servicethat will logically connect the ingress endpoint to a service
Next, create another service that will act as a client. First, create the default scaffolding:
$ ucf_ms_builder_cli service create -n curl-client -i container-image
Replace the content of the default manifest.yaml file with the following:
type: msapplication specVersion: 2.5.0 name: ucf.svc.curl-client chartName: curl-client description: Curl Client version: 0.0.1 tags: [] keywords: [] publish: false
egress-endpoints:
- name: http description: REST API endpoint protocol: TCP scheme: http mandatory: False data-flow: in-out
spec:
-
name: curl-client-deployment type: ucf.k8s.app.deployment parameters: apptype: stateless
-
name: curl-client-container type: ucf.k8s.container parameters: image: repository: nvcr.io/nvidia/pytorch tag: 22.04-py3 command: [sh, -c] args: [ "sleep 10 && curl $egress.http.address:$egress.http.port && sleep 10000 "]
In this client service, you have two additions:
-
A keyword
egress-endpointswith several parameters detailing: name, description, protocol, scheme, mandatory, and data-flow - these should match those defined in theingress-endpoints -
The command
curl $egress.http.address:$egress.http.port- where instead of hardcoding the URL and port of your HTTP server, you can use various ingress/egress endpoints of the microservices at runtime and replace them with the actual values
Creating the Application:#
Just like before, create a default app using:
$ cd $HOME/ucf_tutorial/apps $ ucf_app_builder_cli app create server-client-app
Replace the content of the default application server-client-app/app.yaml with the following:
specVersion: 2.5.0 version: 0.0.1 doc: README.md name: server-client-app description: Server Client Application
dependencies:
- ucf.svc.curl-client:0.0.1
- ucf.svc.http-server:0.0.1
components:
-
name: client type: ucf.svc.curl-client
-
name: http-server type: ucf.svc.http-server
connections: client/http: http-server/http
Note that you have added a connections section mapping client/http to http-server/http.
Under connections - you can specify Egress/Ingress connections between microservices to enable them to talk to each other.
For each service added to the components section, you should set the applicable parameters and connections. The parameters must comply with the parameter schema for that microservice.
The connections are in the format:
<egress-endpoint-component-name>/<egress-endpoint-name>: <ingress-endpoint-component-name>/<ingress-endpoint-name>
Building Microservices and Applications#
To build the microservices and application using ucf_ms_builder_cli and ucf_app_builder_cli respectively:
$ cd $HOME/ucf_tutorial/services
Building HTTP server:
$ ucf_ms_builder_cli service build -d http-server 2022-12-05 15:33:17,584 - Registry - INFO - Building: http-server 2022-12-05 15:33:19,137 - MsBuilder - INFO - Helm chart generated in http-server/output/helm 2022-12-05 15:33:19,149 - MsBuilder - INFO - MS spec generated in http-server/output/msspec 2022-12-05 15:33:19,520 - MsBuilder - WARNING - Mandatory compliance checks failed. Check http-server/output/compliance_test_logs.txt for more information 2022-12-05 15:33:19,633 - MsBuilder - INFO - MS spec generated in http-server/output/msspec 2022-12-05 15:33:19,637 - MsBuilder - INFO - Tests generated in http-server/output/tests 2022-12-05 15:33:19,682 - Registry - INFO - Generating service helm chart package... 2022-12-05 15:33:20,434 - MsBuilder - INFO - Added microservice 'ucf.svc.http-server:0.0.1' to local repository
Building Curl Client:
$ ucf_ms_builder_cli service build -d curl-client/ 2022-12-05 15:33:25,651 - Registry - INFO - Building: curl-client/ 2022-12-05 15:33:27,218 - MsBuilder - INFO - Helm chart generated in curl-client/output/helm 2022-12-05 15:33:27,231 - MsBuilder - INFO - MS spec generated in curl-client/output/msspec 2022-12-05 15:33:27,710 - MsBuilder - WARNING - Mandatory compliance checks failed. Check curl-client/output/compliance_test_logs.txt for more information 2022-12-05 15:33:27,820 - MsBuilder - INFO - MS spec generated in curl-client/output/msspec 2022-12-05 15:33:27,824 - MsBuilder - INFO - Tests generated in curl-client/output/tests 2022-12-05 15:33:27,873 - Registry - INFO - Generating service helm chart package... 2022-12-05 15:33:28,037 - MsBuilder - INFO - Added microservice 'ucf.svc.curl-client:0.0.1' to local repository
Building Application:
$ cd $HOME/ucf_tutorial/apps $ ucf_app_builder_cli app build server-client-app/ 2022-12-05 15:36:34,746 - AppBuilder - INFO - Syncing any missing service versions to cache... 2022-12-05 15:36:34,747 - AppBuilder - INFO - Validating application ... 2022-12-05 15:36:34,751 - AppBuilder - INFO - Building application server-client-app-0.0.1 ... 2022-12-05 15:36:35,257 - AppBuilder - INFO - Application compliance report generated at server-client-app/server-client-app-0.0.1/compliance_report.json 2022-12-05 15:36:35,258 - AppBuilder - INFO - Application Helm Chart generated in server-client-app/server-client-app-0.0.1 2022-12-05 15:36:35,258 - AppBuilder - INFO - App built
Great! The application is built.
Creating and Building Application using Studio#
This section builds on top of Hello World - Creating and Building Application using Studio.
-
Launch UCS Studio and create a new graph. Follow steps in Launch UCS Studio and Create New Graph.
-
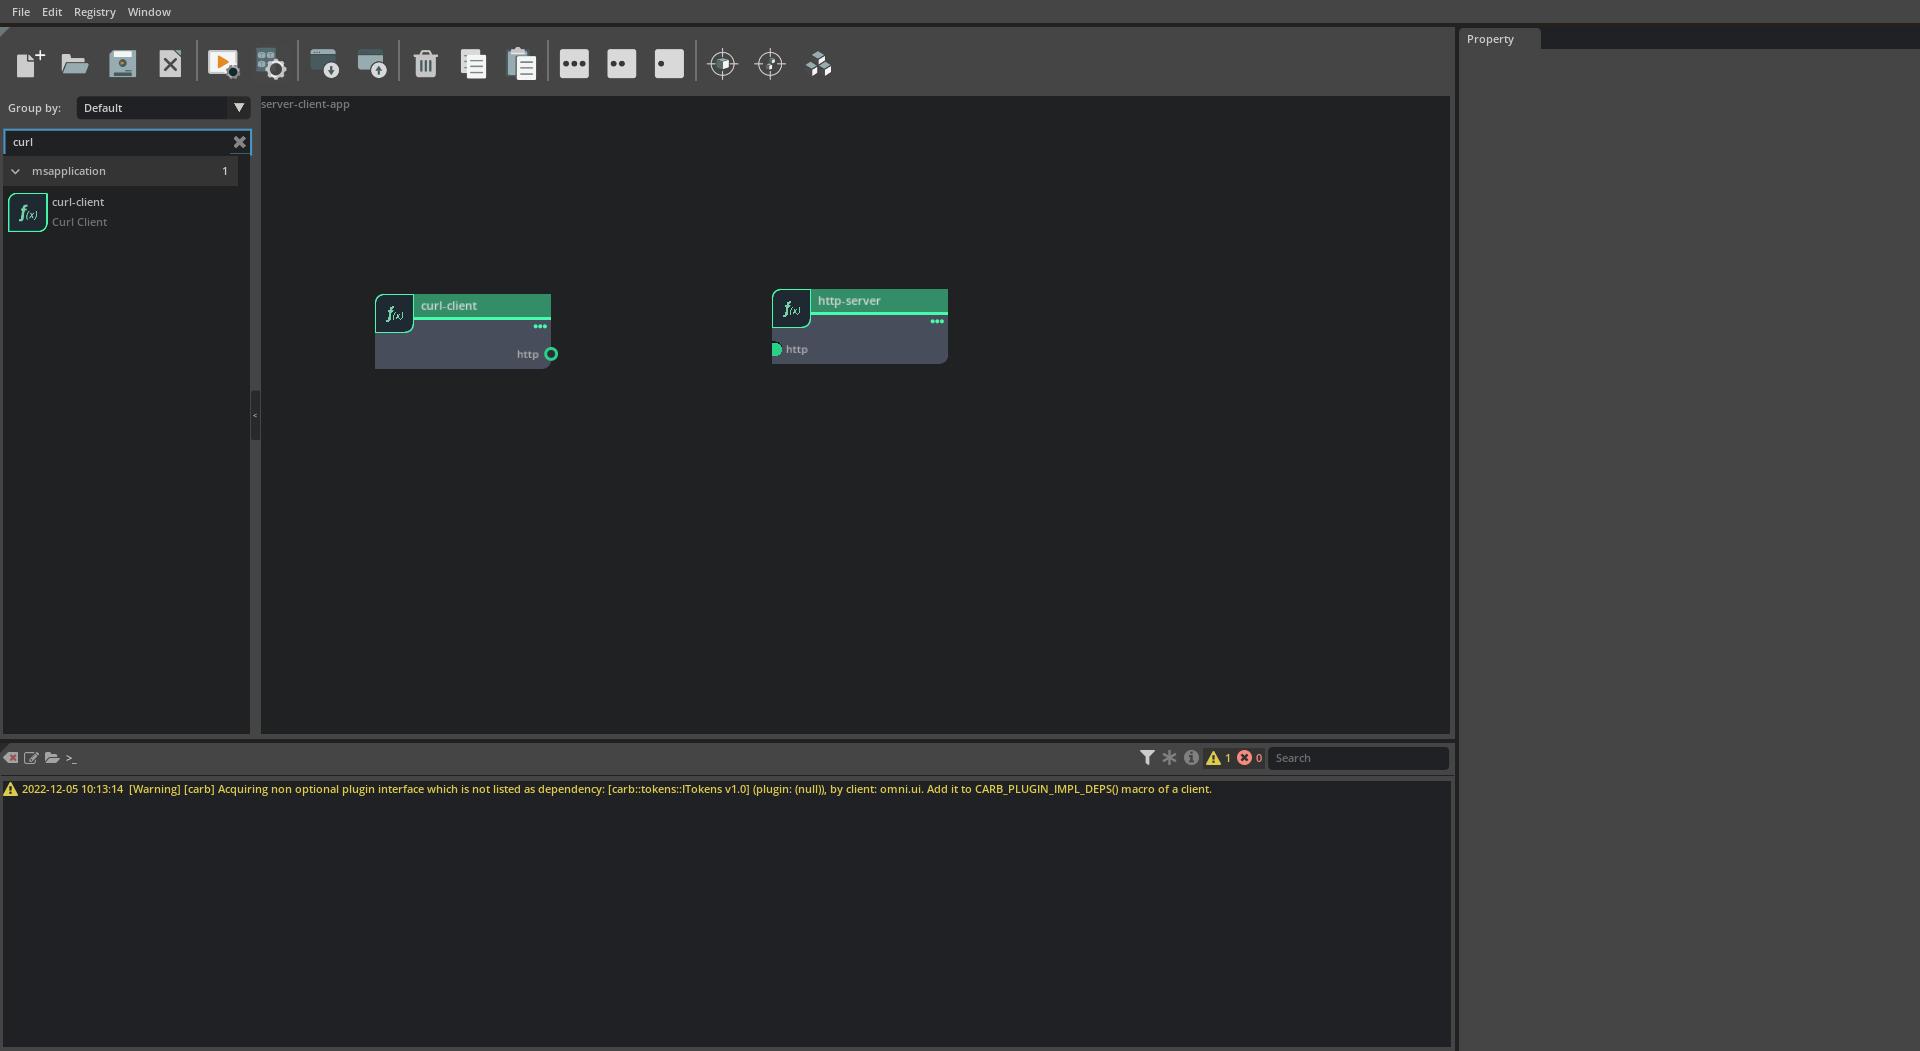
Search and Add Microservices. Search for
http-serverandcurl-clientmicroservices in the microservice list to the left and add them by drag-dropping them to the canvas. The graph should now look as below:
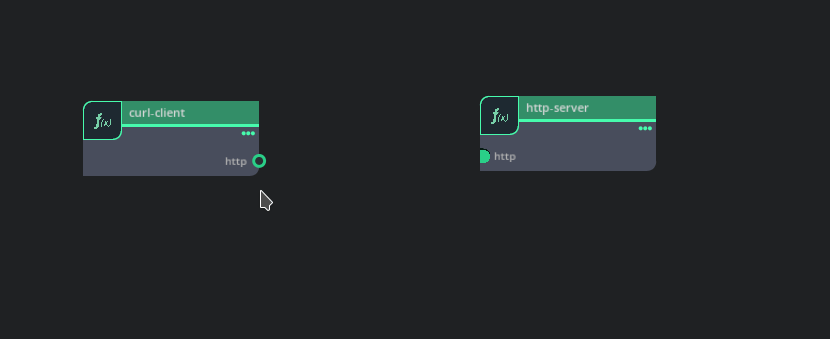
- Connecting microservices - Connect the endpoints by dragging from the
httpegress endpoint of thecurl-clientmicroservice to thehttpingress endpoint of thehttp-servermicroservice.
- Save and Build the App. Follow steps in Save and Build the Application to generate the application helm chart:
Deploying and Running Microservices and Application#
Next, prepare to run the application by checking if there are any services currently running:
$ microk8s kubectl get all NAME TYPE CLUSTER-IP EXTERNAL-IP PORT(S) AGE service/kubernetes ClusterIP 10.152.183.1 <none> 443/TCP 13d
To then create and run the application, run:
$ microk8s helm3 install server-client server-client-app/server-client-app-0.0.1/ NAME: server-client LAST DEPLOYED: Tue Nov 29 13:22:49 2022 NAMESPACE: default STATUS: deployed REVISION: 1 TEST SUITE: None
Inspecting and Debugging Microservices and Applications#
It appears that the application successfully deployed! Double check:
$ microk8s kubectl get all NAME READY STATUS RESTARTS AGE pod/http-server-http-server-deployment-589f99cf99-5wb4g 1/1 Running 0 5m21s pod/curl-client-curl-client-deployment-64b485b4f7-klsvg 1/1 Running 0 5m21s
NAME TYPE CLUSTER-IP EXTERNAL-IP PORT(S) AGE service/http-server-http-server-deployment-svc ClusterIP 10.152.183.232 <none> 8080/TCP 3m19s
NAME READY UP-TO-DATE AVAILABLE AGE deployment.apps/http-server-http-server-deployment 0/1 1 0 3m19s deployment.apps/curl-client-curl-client-deployment 0/1 1 0 3m19s
NAME DESIRED CURRENT READY AGE replicaset.apps/http-server-http-server-deployment-589f99cf99 1 1 0 3m19s replicaset.apps/curl-client-curl-client-deployment-64b485b4f7 1 1 0 3m19s
Examining the logs of the client shows you were able to successfully send a curl to the http-server:
$ microk8s kubectl logs --tail -1 -l "app=curl-client-curl-client-deployment" % Total % Received % Xferd Average Speed Time Time Time Current Dload Upload Total Spent Left Speed 100 594 100 594 0 0 145k 0 --:--:-- --:--:-- --:--:-- 145k
<!DOCTYPE HTML PUBLIC "-//W3C//DTD HTML 4.01//EN" "http://www.w3.org/TR/html4/strict.dtd"> <html> <head> <meta http-equiv="Content-Type" content="text/html; charset=utf-8"> <title>Directory listing for /</title> </head> <body> <h1>Directory listing for /</h1> <hr> <ul> <li><a href="docker-examples/">docker-examples/</a></li> <li><a href="examples/">examples/</a></li> <li><a href="NVIDIA_Deep_Learning_Container_License.pdf">NVIDIA_Deep_Learning_Container_License.pdf</a></li> <li><a href="README.md">README.md</a></li> <li><a href="tutorials/">tutorials/</a></li> </ul> <hr> </body> </html>In the above command, you are selecting the pod using one of its labels (app=curl-client-curl-client-deployment) which you can obtain from the microk8s kubectl describe pod <pod-name> command.
Stopping and Cleaning up Microservices and Applications#
Finally, to stop and clean up the application run:
$ microk8s helm3 uninstall server-client
Links/Buttons:
- #
- Hello World - Creating and Building Application using Studio
- Launch UCS Studio
- Create New Graph
- Save and Build the Application